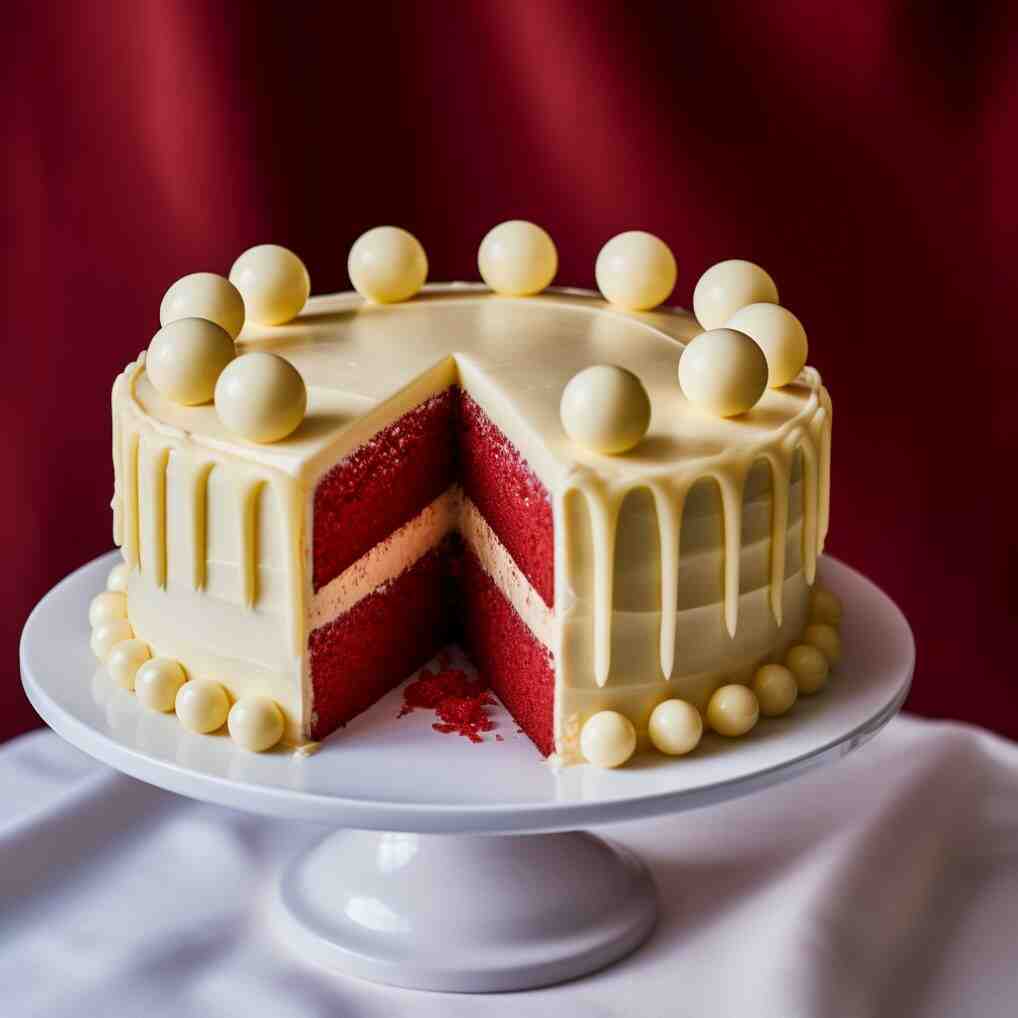
This classic Mary Berry Red Velvet Cake recipe is a showstopper for both kids and adults. With its moist and flavorful vibrant red sponge layers, topped with luscious buttercream icing and the white chocolate truffle balls it will never fail to fulfil your expectations
Prep: 20 mins Total: 1hr 20 mins Yields: 8
RELATED FROM MARY MAKES IT EASY:
Why you’ll like it
- Luxurious look. The vibrant red colour of the cake contrasting with the colour of the buttercream icing makes it visually appealing. The addition of white chocolate truffle balls adds a touch of elegance making it impossible to resist.
- Texture. The moist and flavorful sponge layers melt in your mouth while the creamy and tangy buttercream icing with mascarpone cheese is simple to make but impressively good.
- Mary makes it easy. Mary Berry came to the rescue with simple ideas to impress his friends, including this glorious red velvet cake. The easy-to-follow instructions ensure a perfect result every time.
Mary Berry Red Velvet Sandwich Cake Recipe
What is Mary Berry’s Red Velvet Cake
Mary Berry’s Red Velvet Cake is a delightful twist on the traditional Red Velvet Cake. With its moist sponge layers and creamy buttercream icing, this recipe is a true winner.
Mary Berry’s Red Velvet Cake stands out from the original recipe with its unique buttercream icing made with full-fat mascarpone cheese adding a creamy and tangy element to the cake. The white chocolate truffle balls as decoration add an extra touch of elegance and indulgence.
Ingredients
For the cake:
- Butter – 1 tablespoon butter for greasing
- Plain flour – 250g (9 ounces) plain flour
- Cocoa powder – 1 tablespoon cocoa powder
- Baking powder – 2 teaspoons baking powder
- Bicarbonate of soda – 1 teaspoon bicarbonate of soda
- Light muscovado sugar – 250g (9 ounces) light muscovado sugar
- Buttermilk – 200ml (1/3 pint) buttermilk
- Sunflower oil – 150ml (1/4 pint) sunflower oil
- Vanilla extract – 2 teaspoons vanilla extract
- Red food colouring gel – 1 tablespoon red food colouring gel or (1/4 teaspoon food colouring paste)
- Eggs – 2 large eggs
- Water – 100ml (3½fl ounces) water
For the filling & topping
- White chocolate truffle balls – 8 white chocolate truffle balls to decorate
- Butter – 250g (9 ounces) butter for the buttercream icing
- Vanilla extract – 2 teaspoons vanilla extract for the buttercream icing
- Icing sugar – 300g (10.5 ounces) icing sugar for the buttercream icing
- Mascarpone cheese – 250g / – / 250g / 9oz full-fat mascarpone cheese for the buttercream icing
How to make Mary Berry Red Velvet Cake?
- Preheat the oven and butter the tins. Preheat the oven to 180°C/160°C Fan/Gas 4. Grease and line the two sandwich tin bases of 20cm (8in) with non-stick baking paper.
- Mix the cake’s dry ingredients. Mix thoroughly the flour, cocoa powder, baking powder, bicarbonate of soda and sugar in a bowl.
- Mix the cake’s wet ingredients. Add the buttermilk, oil, vanilla, food colouring and 100ml (3½fl oz) water in a jug. Add the eggs and whisk until smooth.
- Mix dry and wet ingredients. Pour and whisk the wet ingredients into the dry ingredients until combined into a bright red mixture. You can also add more colouring if you think it’s not bright enough. Note that normally the mixture will get darker as it cooks
- Bake the two cakes. Divide the mixture evenly between the two prepared tins levelling the surfaces and bake for about 25–30 minutes. When baked the cakes should be well risen and shrinking away from the sides of the tins. Leave to cool in the baking tins for around 10 minutes and then leave to cool completely on a wire rack.
- To make the buttercream icing. Place the soft butter in a large bowl adding the vanilla extract and sift in half the icing sugar. Mix with an electric whisk until smooth. Sift in the remaining half of the icing sugar whisking well. Finally, add the mascarpone cheese to the mixture and gently stir with a spatula (not the whisk) until smooth. Note that beating with a whisk may cause the buttercream to split. Put a fluted nozzle in a piping bag and fill in about 2/3 cup (150g/5oz) of the buttercream into the bag.
- To assemble the cake and chill. On a cake plate place one of the sponges spreading a third of the buttercream on top. Then using the remaining sponge cover with the other sponge, closing the sandwich cake. Ice the cake with a “crumb coat” by spreading a thin layer of icing and chilling for 30 minutes.
- Decorate & chill. Pile the remaining icing from the bowl on top and spread over the top and the edges. Make sure that the icing is smooth around the edges before covering the sides. Then with a small palette knife make wide lines up the sides and swirl the top. With the fluted nozzle, pipe a rope design around the top edges of the cake and decorate nicely with the 8 chocolate truffles to finish and chill again before serving.
Tips
- Use two 20cm (8 inches) sponge sandwich tins to bake the cake. For the buttercream icing, you will need a fluted piping nozzle, a piping bag and an electric whisk.
- The sponges can be made up to 3 days ahead and will stay moist if wrapped in cling film or eco wrap.
- This cake freezes well without the icing.
Variations
- Add a cream cheese frosting instead of mascarpone for the buttercream icing for a more traditional Red Velvet Cake.
- Top the cake with fresh berries or chocolate shavings for added flavour and decoration.
- Experiment with different food colouring options to achieve your desired shade of red.
- Bake another sponge and make more buttercream to add an extra layer of sponge.
How to serve Mary Berry Red Velvet Sandwich Cake
This Mary Berry Red Velvet Cake is perfect for any celebration or special occasion. Serve it as a centrepiece dessert at a birthday party, anniversary, or holiday gathering. Pair it with a scoop of vanilla ice cream or a dollop of whipped cream for an extra indulgent treat.
I love pairing red velvet cake with a latte but any hot drink actually will do. If you’re serving it to kids they might like it with a babycino with powdered cocoa on top and a handful of small marshmallows.
Storing Red Velvet Sandwich Cake
Store any leftover cake in an airtight container at room temperature for up to 3 days. Alternatively, you can freeze the cake (uniced) for future enjoyment. Just make sure to wrap it tightly in cling film or eco wrap before freezing.
You might like more…
MORE MARY BERRY CAKES WITH A CREAMY FILLING
- Mary Berry Banana Cake with Cinnamon Cream Cheese
- Mary Berry’s Coffee & Walnut Cake
- Mary Berry Blackberry Cheesecake with Ricotta
- Mary Berry Carrot Cake

Mary Berry Red Velvet Cake
Ingredients
- butter for greasing
- 250 g 9 ounces plain flour
- 1 tablespoon cocoa powder
- 2 teaspoons baking powder
- 1 teaspoon bicarbonate of soda
- 250 g 9 ounces light muscovado sugar
- 200 ml ⅓ pint buttermilk
- 150 ml ¼ pint sunflower oil
- 2 teaspoons vanilla extract
- 1 tablespoon red food colouring gel ¼ teaspoon food colouring paste
- 2 large eggs
- 8 white chocolate truffle balls to decorate
For the buttercream icing:
- 250 g 9 ounces butter, softened
- 2 teaspoons vanilla extra extract
- 300 g 10½ ounces icing sugar
- 250 g 9 ounces full-fat mascarpone cheese
Instructions
- Preheat the oven and butter the tins. Preheat the oven to 180°C/160°C Fan/Gas 4. Grease and line the two sandwich tin bases of 20cm (8in) with non-stick baking paper.
- Mix the cake's dry ingredients. Mix thoroughly the flour, cocoa powder, baking powder, bicarbonate of soda and sugar in a bowl.
- Mix the cake's wet ingredients. Add the buttermilk, oil, vanilla, food colouring and 100ml (3½fl oz) water in a jug. Add the eggs and whisk until smooth.
- Mix dry and wet ingredients. Pour and whisk the wet ingredients into the dry ingredients until combined into a bright red mixture. You can also add more colouring if you think it's not bright enough. Note that normally the mixture will get darker as it cooks
- Bake the two cakes. Divide the mixture evenly between the two prepared tins levelling the surfaces and bake for about 25–30 minutes. When baked the cakes should be well risen and shrinking away from the sides of the tins. Leave to cool in the baking tins for around 10 minutes and then leave to cool completely on a wire rack.
- To make the buttercream icing. Place the soft butter in a large bowl adding the vanilla extract and sift in half the icing sugar. Mix with an electric whisk until smooth. Sift in the remaining half of the icing sugar whisking well. Finally, add the mascarpone cheese to the mixture and gently stir with a spatula (not the whisk) until smooth. Note that beating with a whisk may cause the buttercream to split. Put a fluted nozzle in a piping bag and fill in about 2/3 cup (150g/5oz) of the buttercream into the bag.
- To assemble the cake and chill. On a cake plate place one of the sponges spreading a third of the buttercream on top. Then using the remaining sponge cover with the other sponge, closing the sandwich cake. Ice the cake with a "crumb coat" by spreading a thin layer of icing and chilling for 30 minutes.
- Decorate & chill. Pile the remaining icing from the bowl on top and spread over the top and the edges. Make sure that the icing is smooth around the edges before covering the sides. Then with a small palette knife make wide lines up the sides and swirl the top. With the fluted nozzle, pipe a rope design around the top edges of the cake and decorate nicely with the 8 chocolate truffles to finish and chill again before serving.